Background
Whether you’re a student learning the ropes or a professional reversing nation-state malware, a virtual machine (VM) is the de facto environment for malware analysis. The reasoning is simple: infection is intentional but mistake will be made. VMs allow dangerous binaries run amuck in a controlled environment where resetting the system doesn’t require reformatting a drive or reinstalling an OS from scratch. They’re disposable by design, which is exactly what you want when poking at malicious binaries.
A VM specifically for malware analysis adds unique constraints. It must be isolated enough to protect the host and nearby systems, but not so locked down that the malware fails to behave naturally. It should be easy to revert to a clean state, yet configured with enough tools to be functional.
This guide focuses specifically on building a VM that’s well-suited for malware analysis by striking a balance between safety and realism. Its about putting together a practical setup that supports real-world reverse engineering, where questionable choices are made to better observe and understand malware behavior.
Setup
Virtualization Software
There are several virtualization options out there for creating and managing a VMs. A popular choice is VMware, but it is not free for commercial use. A less common option is Proxmox, which which is free without their enterprise repository, open source, and what I use to manage services in my homelab. However, most people will not go through the hassle of configuring a second physical system to manage a single malware analysis VM. That leaves Oracle VirtualBox. It is free to use, open source, and frankly the option I am most experienced with.
The Operating System
Before creating a VM, the operating system (OS) needs to be chosen. This is the first time the question “what is the purpose of reverse engineering” needs to be considered before moving forward. While malware exists for every OS, malware that aims to infect everyday people will most likely target Windows. More specifically, as of July 2025, more people are using Windows 11 than Windows 10. So, for the largest sample size of malware, a Windows 11 VM has been chosen.
A legitimate ISO for Windows 11 can be downloaded from Microsoft’s official website assuming you pass some fair-use checks they perform in the background.
Creating a Local Account
The process to create a new VM with the ISO installed in the optical drive will depend on the virtualization software used. If you cannot figure this out, then I recommend learning to reverse engineering innocuous software before handling malware. Additionally, make sure the system requirements defined by Microsoft are met or exceeded. I prefer to over estimate the disk size I will need since it is the most cumbersome to change later on.
Once up and running, the Windows installation process is straight forward with a few caveats:
- When prompted for a product key, click “I don’t have a product key.”
- When prompted for an image, select Windows 11 Home.
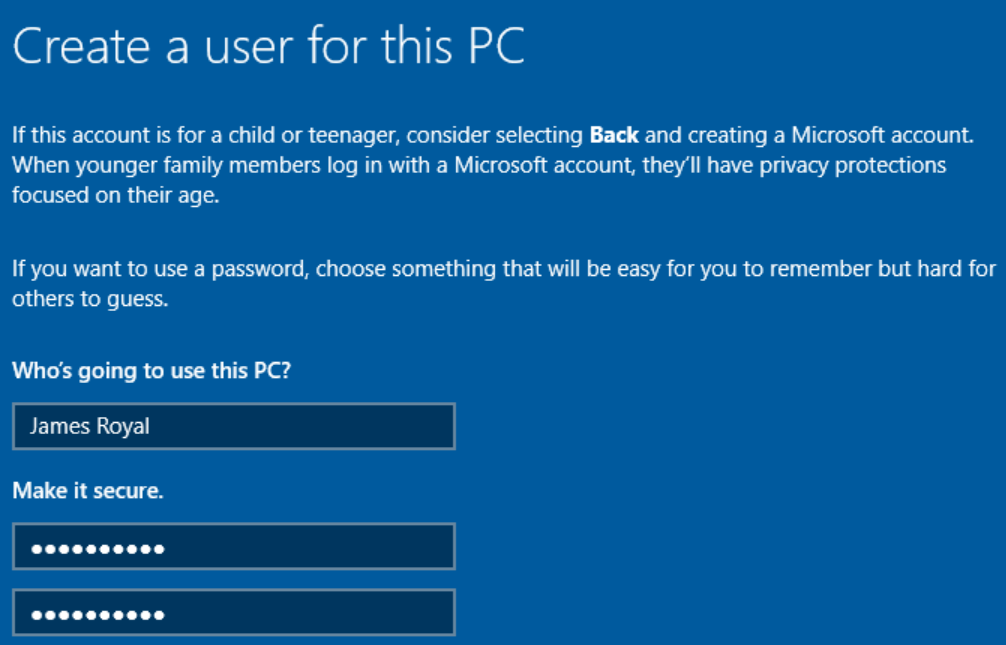
- When prompted to name the computer, click Shift+F10 and execute
start ms-cxh:localonlyto create a local user.
The name of the user can be anything, but your own name is not recommended. The password can also be anything, but should not be a password used anywhere else; this is especially true here, since the password may be leaked by malware as a result of misconfiguration. As for security questions, consider making a persona that can be easily remembered.
Post Installation Preparation
First, applying updates to the VM is unnecessary. In fact, purposely leaving in security weaknesses will allow more malware to execute as time goes on, which is ideal for its use case. So, to disable automatically applied update, perform the following:
- Windows+R to run regedit
- Go to HKEY_LOCAL_MACHINE\SOFTWARE\Policies\Microsoft\Windows
- Create a new key named WindowsUpdate.
- Under WindowsUpdate, create another new key named AU.
- Under AU, create a new DWORD (32-bit) Value named NoAutoUpdate
- Set NoAutoUpdate to 1.
Intuitively, the presence of an antivirus is usually undesirable for malware analysis, including Windows Defender. The tool windows-defender-remover will handle the antivirus and other security components automatically. Of course, this is detected as malware itself, so real time protection needs to be disabled manually once before downloading and executing the script.
Software Installation
There a several precompiled toolkits available online, like retoolkit and its forks. However, I find they include a lot of bloat to appease every possible user (i.e. including five hex editors). So, they are better fit for an idea of what to install. My personally curated list is as follows, ordered alphabetically, not preferentially:
- Binary Analysis
- Debugging
- DotNET
- Hex Editor
- Java
- Memory
- Network
- Utilities
Now is another time to answer the question “what is the purpose of reverse engineering” to select additional tools. For example, if the goal is to deploy a web application used to interact with a malware sample using a local command-and-control (C2) server, then there should be a tool that allows for that development. Likewise, if Java will never be targeted, tools under that category can be left out.
It may also be worth uninstalling anything that comes preinstalled with the OS that is not wanted.
Hardening
The main aspect of hardening is to isolate the VM as much as is feasible. The fewer points of communication that are available to malware, the lower the likelihood of spreading or sharing identifying information about the analyst.
Networking
With the existence of worms, it is extremely important to isolate the network that the malware runs on. Other systems connected to the network are at risk of being infected.
Even if the target is not a worm, identifying information may be sent to unknown endpoints. So connection to the internet should be avoided unless the malware has been analyzed beforehand and the risks are acceptable for the situation.
As for local communication, there are a handful of options.
No Network
The most simple way to isolate the VM network is to not have a network to begin with. This is easy to toggle in every aforementioned virtualization software, making it appealing. However, many malware samples require access to a network, and some will completely change behavior if no network is detected.
Host-Only Network
Another option is to allow the VM to connect to a host-only network, where the only other accessible system is the host machine. This allows the VM and the host to communicate, but the VM would be unable to connect to the internet. This is a dangerous game to play, especially if your VM and host use the same OS that the malware is targeting; infection may spread to the host if it is not also hardened.
VLAN
A “best of both worlds option” is to have a completely independent network for malware analysis. At the virtual layer, this can be done with a VLAN, allowing VMs to communicate only with each other. This has the added benefit of a “day-to-day” system never being exposed to the communications.
Dedicated Physical Network
An advanced but powerful option is to create an isolated network at the physical layer using a dedicated router. The benefit to this over the VLAN is that other physical devices may connect to the router, which is especially valuable if an already-infected device is received or something like a cellphone is of interest.
The host may connect to a safe network and the malware network over different interfaces (i.e. Ethernet and WiFi). Then, with OS-dependent configuration, the host can drop all incoming traffic on the malware network. With the VM network configured as a bridged adapter to the malware network interface, it will be able to communicate with every other endpoint but the host. On a Linux host, these two simple commands can be used to configure the firewall in such a way:
iptables -A INPUT -i <interface_name> -j DROP
iptables -A OUTPUT -o <interface_name> -j ACCEPT
Convenience Software
Virtualization software provides the user with ways to communicate between the host and the guest: sharing a clipboard, USB ports, and even entire folders. However, these act as avenues of communication for malware as well.
Take a shared USB port for example. Let’s say a thumbdrive is shared to the malware-infested VM. Later, the VM is unexpectedly shut down without unplugging the thumbdrive, thus transferring control of the thumbdrive from the VM to the host. If the malware spread onto the thumbdrive during the time it was controlled by the VM, then it may spread onto the host.
Likewise, a shared folder is an easy communication path from VM to host. Particularly for ransomware, shared folders pose no benefits worth the risk.
Conclusion
With all that hard work done… take a snapshot to act as a baseline between malware samples.
The VM is now ready to analyze malware in a way that is as safe and secure as possible. Enough carelessness on the internet might result in some interesting downloads, but the de facto source of malware for security research is vx-underground. Or, if you know the hash and have a premium account, you can download it from VirusTotal.