
Background
Per the FBI, Mamba is a ransomware that was used to target a slue of industries. By using the open source tool DiskCryptor, all contents on a single drive would be encrypted, including the operating system. The only way to decrypt the drive and restore the data on it would be to enter a password, known only by the attacker. Of course, the password would only be given on the condition that payment was received.
On the surface, this does not sound like anything special; an executable is run with a set password, the disk is encrypted, and the owner of the disk is left upset. There are no vulnerabilities here, just a user running something they should not or an attacker having unauthorized access.
However, having never analyzed this specific ransomware, I was intrigued enough to run it locally on a secure malware analysis VM. So, I downloaded an encrypted version of Mamba from theZoo on GitHub and transferred it to the analysis environment. Given that all functionality is local, I disconnected the VM from the network.
Dynamic Analysis
With anticipation, I double-clicked the executable and… nothing happened. To troubleshoot the malware (which is a bizarre concept), I used Sysinternals’s Process Monitor (A.K.A. ProcMon) to view what was happening behind the scenes. To cut down on the noise of output, I filtered the output to only include the name of the executable. As expected, execution was short lived, but the output was still overwhelming. Fortunately, near the end, the process attempts to create C:\DC22\log_file.txt, but fails since that directory does not exist.

The C:\DC22 directory was created and the malware was run again in the same way. This time ProcMon shows two additional entries: writing to the log file, and closing the log file. Opening the log file in Notepad shows “Password not set.exit” which was expected to be the password for encryption. So, rather than double-clicking, the terminal would need to be used to provide “password” as the first argument.
Unfortunately, the VM restarts before getting a chance to examine ProcMon in depth. However, it was noted that the log file would print “getting share drive information” about a second before reboot. With a better idea of timing, the VM was restored to a baseline snapshot for a second attempt of killing the malware process before the system reboot. This is likely to cut off some operations from being captured, but it’s better than nothing. At this point, the log file shows the following:
Checking resources existence. They are OK...
installing driver...
getting share drive information...
Trying to create service...
creating service successfully. rebooting windows...
Dropped Files
With some interesting information, the encryption process was repeated for a third time, this time allowing the system to perform its initial reboot. Afterwards, a snapshot was taken to go back to in the event that total lockout occurs during analysis.
Meanwhile, ten files are found in the C:\DC22 directory:
- dcrypt.sys
- dcapi.dll
- dccon.exe, dcinst.exe, dcrypt.exe, Mount.exe, netpass.exe
- log_file.txt, netpass.txt, netuse.txt
Before deep-diving into any of the binary files to determine their purpose, a simple search online reveals that files starting with “dc” are related to the open source drive encryption software DiskCryptor. On one hand, it is slightly disappointing that the implementation of encryption is so straightforward; on the other hand, it is probably a good thing from a victim’s point of view that the ransomware is nothing special.
Nevertheless, after rebooting the system, the log file also continues to update. This indicates that the malware is running automatically after system boot. The log file appends the following, final messages after some time:
Checking resources existence. They are OK...
driver installed before...
starting serviceMain...
ServiceMain: Entry
 ServiceMain: Performing Service Start Operations
ServiceMain: Waiting for Worker Thread to complete
ServiceWorkerThread: Entry
Starting Mount app...
Checking resources existence. They are OK...
driver installed before...
mount:start...
pass:
password
mount:mounting share drive
mount:share drive not found ...
mount:exit Mount...
start hard drive encryption...
ServiceCtrlHandler: Entry
ServiceCtrlHandler: Exit
Auto Run
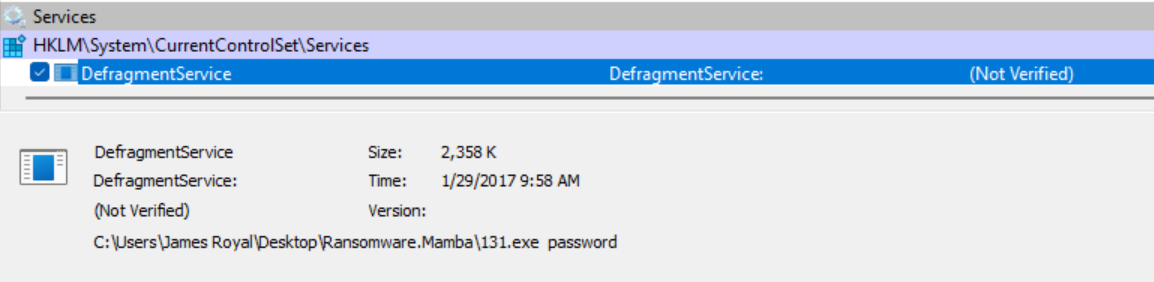
The service used to execute the malware at startup was investigated. This is a simple task using Sysinternals Autoruns tool.
This shows that Mamba is disguising itself as “DefragmentService” in the HKLM\System\CurrentControlSet\Services registry key. It is seen to execute the same file as was initially executed, not a copy. The password is also automatically passed as the first argument.
No Ransom Message?
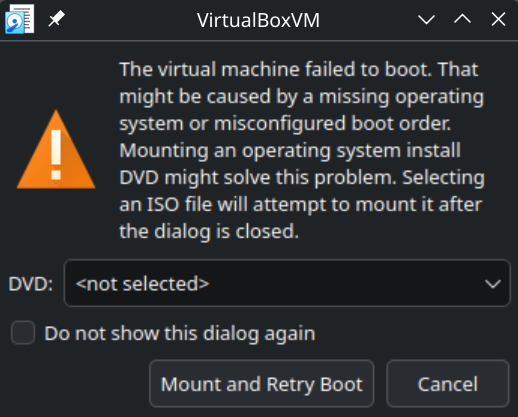
After 2.5 hours since the reboot, the Windows VM had still not rebooted to a ransom message. In an attempt to get the ransom message, I took a live snapshot of the VM and manually rebooted. Upon power up, VirtualBox displayed a warning message that the boot had failed. This is a good sign that encryption had occurred, but resulted in absolute data destruction.
The VM was restored to the live snapshot to wait a while longer in the event that encryption just did not complete. It was verified that the executable for the service was still running using the Task Manager, but the resource usage was basically 0. This is especially strange for the disk usage metric, since it would be expected to have several read/writes for encrypting the file system.
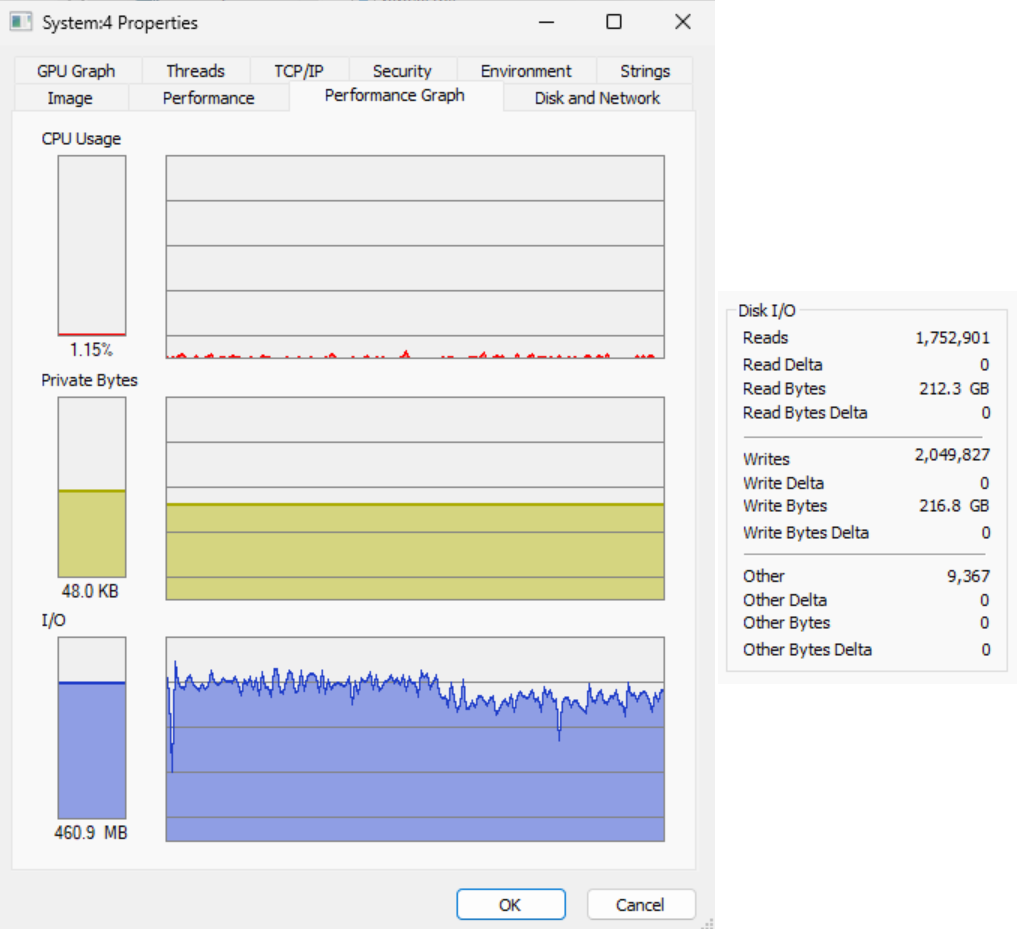
To compare, the VM was restored to a snapshot taken after executing the malware, but before encrypting the file system. After a short time of waiting the disk usage shot up from 1% to 90% as a result of a process named “System.” With a PID of 4, it starts very early in the boot cycle and is responsible for–among many things–drivers. Based on the log messages and a quick Google search, it can be learned that DiskCryptor works as a driver, so the “System” process is unusual.
Once the disk usage goes back to 1%, the number of bytes read by the process match the partitioned size of the C drive, where a slightly higher write size can be attributed to other drivers running under the same process.
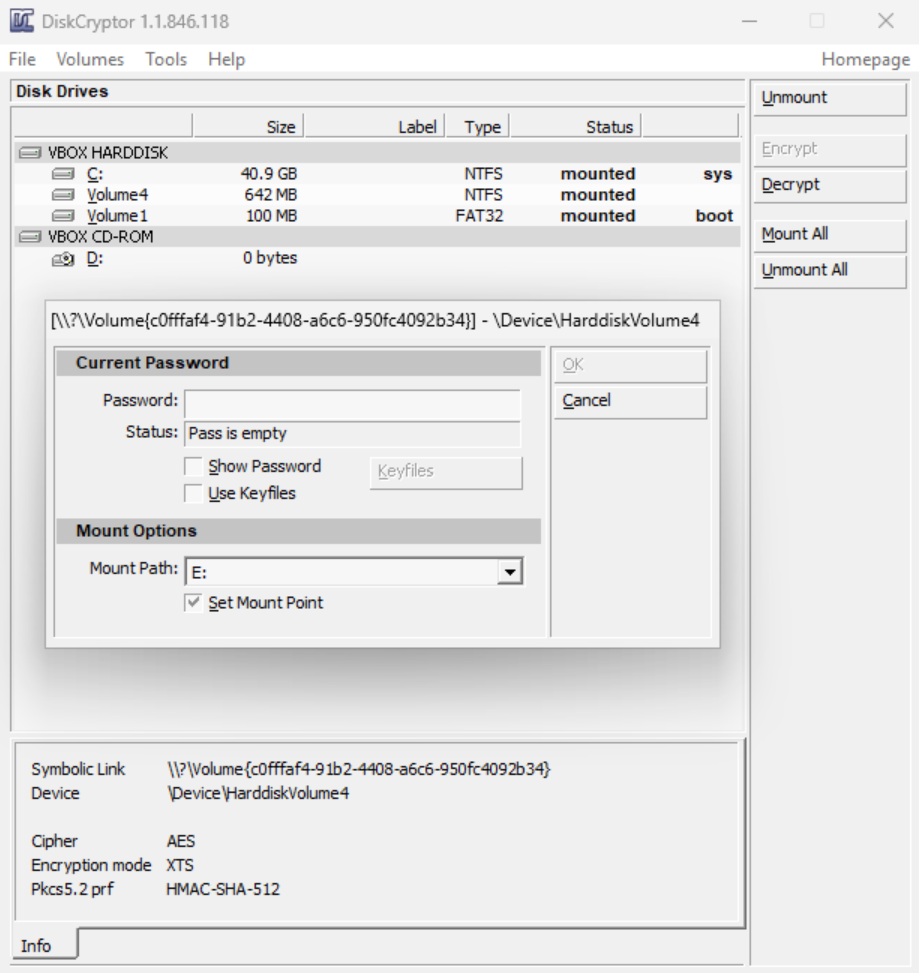
As a last ditch effort, the repository for DiskCryptor was examined for an open issue related to this behavior. This revealed that DiskCryptor was incompatible with Windows 10/11 up until version 1.3. To check the version of DiskCryptor being used, C:\DC22\dcrypt.exe was launched to show a GUI for DiskCryptor and opened the about window. This reveals that this Mamba sample uses version 1.1.846, which is the last official release from the original developer.
So, while the Mamba successfully encrypts the data, there is no hope of the data being decrypted at boot. Despite this, the data can successfully be decrypted in the GUI, which shows the encryption scheme as AES-XTS with HMAC-SHA-512.
Memory Forensics
While the data is unlikely to ever be decrypted after a reboot, memory analysis is an interesting avenue to explore while the system is still powered on.
Threat Model
Let’s consider a situation where a bad actor has executed Mamba on a victim’s system and has rebooted it once to start the encryption process. The particularly tech-savvy victim was actively on the system, and chooses to open Sysinternals Process Explorer after the reboot to check for anything unusual. A large disk utilization from the “System” process is noticed, along with an enormous listing of file handles. Recognizing this as potential ransomware, the victim performs a memory dump.
Overall, this is unlikely, but perhaps not impossible.
Idea and Setup
To perform encryption an encryption key must be stored in memory. Since AES is a symmetric encryption algorithm, the same key is used to decrypt. So, if that key can be picked out from the memory dump, then it might be possible to perform decryption using a modified version of dcrypt.exe that takes the key as input instead of a password.
To keep execution times within a manageable timeframe, the VM was restored to the baseline snapshot, before Mamba was executed. Next, the size of memory was decreased to 8 GB and the partition for the C drive was decreased to 50 GB. A smaller memory allocation makes searching for the decryption key faster, while a smaller C drive partition allows encryption to complete more quickly. A larger search space in the RAM dump and a larger C drive partition are feasible, just slow for research purposes.
After these changes, Mamba was reinstalled, thus rebooting the VM. Task Manager was closely watched for a spike in disk usage, indicating the start of the encryption process. Several memory dumps were performed periodically at this time using the following commands on the host machine:
VBoxManage list vms # Get the UID for all VMs
VBoxManage debugvm <UID> dumpvmcore --filename active.raw
Finally, encryption was allowed to complete, indicated by a dip in disk utilization.
Debugging the Key
It is worthwhile to confirm the decryption key recovered from the memory dump is correct before attempting manual decryption. This makes it easier to confirm that any errors are in implementation, not the input.
To do this, software can be debugged to determine the encryption key that is derived from the known password. This is obviously not possible for a real victim to perform, but the idea is to allow a real victim to try every discovered key in the memory dump and hope one is correct.
User-Mode Debugging
First, there needs to be a basic understanding of the GUI software, C:\DC22\dcrypt.exe. Upon execution, a list of partitions on the virtual hard drive is shown. Selecting any of these partitions will allow for a button labeled “Decrypt” to be clicked, indicating that they are indeed encrypted. If clicked, a dialogue will appear with a prompt for a password. Entering a correct password will decrypt the partition, while an incorrect message will display an error dialogue.
Next, the executable was loaded into Ghidra and opened using the CodeBrowser. Following control flow from the entry point to an assumed main function reveals some good luck: functions performing the “heavy lifting” of DiskCryptor are being imported from dcapi.dll. This is good luck because a DLL file must export its symbols for other software to import it. The presence of symbols makes the reverse engineering process much more simple.
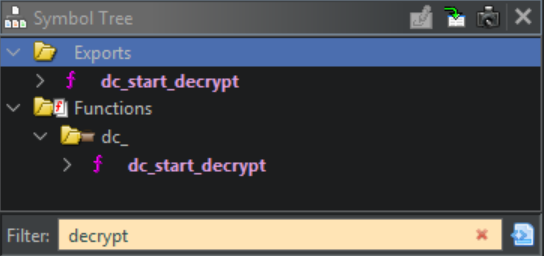
The API file is located in the same directory as dcrypt.exe. After importing it to the same Ghidra project and opening it in the CodeBrowser, a full list of 68 exported functions can be found in the Symbol Tree panel. Since interest lies in decryption, a search can be performed for the keyword “decrypt” to reveal the function dc_start_decrypt.
While the function names are intact for the DLL file, function parameters are not. However, with DiskCryptor, the luxury of source code is provided. Referring again to the GitHub repository, the source code for the utilized version of the software can be downloaded in a zip file. The source code can be searched for the function name dc_start_decrypt, which shows its implementation in dcapi/drv_ioctl.c. The biggest point of interest here is the function definition:
int dc_start_decrypt(wchar_t *device, dc_pass *password)
With a parameter named password and the forced presence of a function symbol, this is a great starting point. However, the format of a dc_pass is currently unknown. Performing a search through the source code again points to boot/vc2008_src/asm/struct.inc. The inc extension denotes an include file, much like header file in C/C++. Its contents are in MASM-style assembly, but the structure is relatively simple to understand.
struct dc_pass
 size dd ?
 pass rw 128
ends
The structure defines two members: a double word (left uninitialized) and a 128-word array (which is 256 bytes). While the purpose of these members can be guessed, it is more certain to use a debugger to check. The GUI process was attached to using an elevated session of x64dbg. Next, the Symbols tab can be examined to for the expected dcapi.dll file and its symbol, dc_start_decrypt.

After setting a breakpoint at the entry of the function, the process to decrypt a partition was followed, leading to the breakpoint being hit. Using the __fastcall calling convention, the second parameter will be stored in RDX, with a value of 0x810000. Navigating to this address in one of the x64dbg memory dump panels reveals the structure members’ purpose: the word array is the entered password in UTF-16 encoding, and the double word is the length of the entered password in words (not bytes). This means that the DiskCryptor driver (dcrypt.sys) will need to be debugged to reveal the derived key.

Kernel-Mode Debugging
First, the transfer from user-mode to kernel-mode needs to be identified. In the aforementioned dc_start_decrypt function, a call to DeviceIoControl is performed. Using the official documentation, it can be learned that this function sends a control code directly to a specified device driver. In this case, the driver is likely to be dcrypt.sys and the control code is DC_CTL_DECRYPT_START.
The source code was searched to find usage of the constant variable used for the control code, leading to dc_ioctl_process. From here, the data flow was statically traced to discover that the entered password is eventually passed to sha512_pkcs5_2. After much reverse engineering, this function was located in the binary code of the compiled driver dropped by the malware. Most notable is a call to memcpy that is performed at the end of the hashing function (address 0x3570D) to copy the hashed and salted decryption key into a buffer. This at the end of a loop, so it will need to be examined multiple times.
With an idea of where to set a breakpoint to examine the decryption key in action, WinDbg must be configured to allow the kernel to be debugged from a separate VM. I used a guide on Github for this, including some minor tweaks for my specific network setup. This did require the malware VM to be restored to an uninfected snapshot for configuration, but this is a minor inconvenience.
After encryption was allowed to complete again, the kernel debugger was used to send a break. To verify that the dcrypt module is running and can be debugged, it was searched for in the loaded module list by executing “lm m dcrypt” in WinDbg. Next, the breakpoint address in Ghidra must be translated to an offset. The base address of dcrypt.sys is known to be 0x10000 and the breakpoint address is 0x3570D. So, the offset is simply 0x3570D - 0x10000 = 0x2570D. To set the breakpoint, “bp dcrypt+0x2570D” was executed in WinDbg.

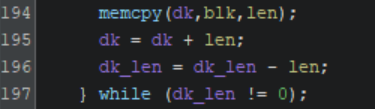
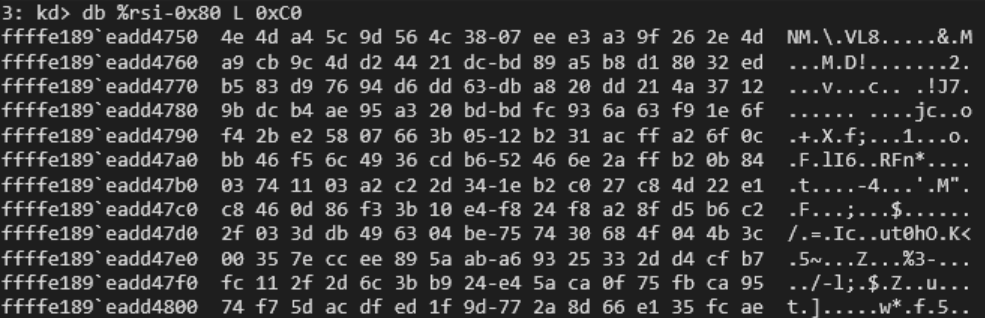
With the breakpoint set, the user-mode software was executed on the malware VM to begin decryption of the main partition. After typing the password and clicking the OK button, the malware VM paused and a message appeared on the debugging VM, indicating that the breakpoint was hit. As seen in Image 9, the dk variable is increased by the len variable. In Image 10, this action maps dk to RSI and len to RDI.
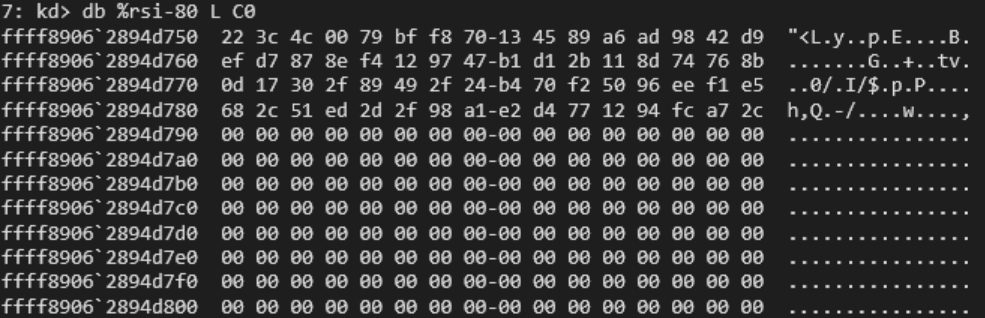
Using this information, the call to memcpy was stepped over and the register values were examined. RDI held the value 64, while RSI contained the address of a destination buffer. This is logical, since the function computes a SHA-512 hash, which is 64 bytes long (64 * 8 = 512). After dumping the hash value, execution was allowed to continue. This process repeated another two times, resulting in the following three SHA-512 hashes being generated and stored adjacent in memory:
Finding the Key in Memory
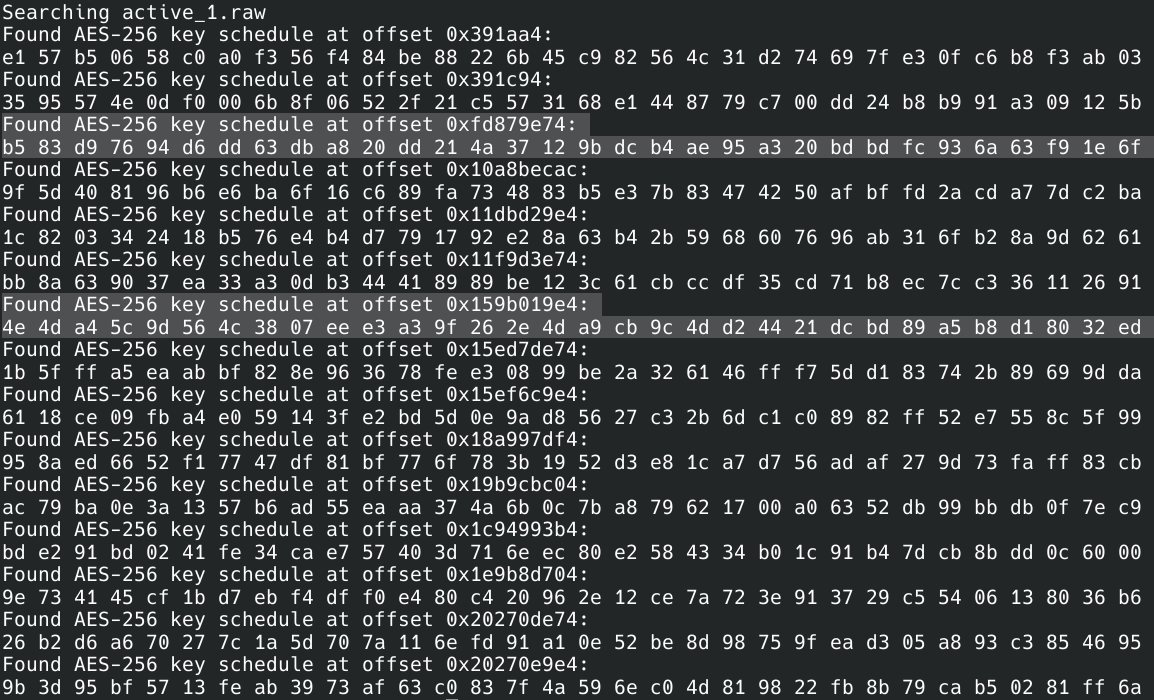
The concept of searching a memory dump for cryptographic keys is not a novel one. In fact, the open source tool findaes will perform such a task for AES-128, AES-192, and AES-256 key schedules. For the sake of speed, only the checks for AES-256 were left in the source code before compiling, since it is known the DiskCryptor uses this size.
Three memory dumps were performed during the encryption process, and all three included keys that were revealed by debugging the driver! While not nearby each other in the memory dump, both keys are from the first SHA-512 hash.
Decryption Software
A working software to perform decryption will not be developed at this time, but it is not difficult to imagine how it might work: while using dcrypt.exe, a byte array could be entered instead of providing a password to decrypt a partition. That does not account for the two SHA-512 hashes after the master key, but analysis does not reveal that data being used. They are likely intended for the HMAC implementation to ensure data integrity, but there are no integrity checks to be found in the source code. So, 128 zeros can be provided in place of the later hashes.
To test this, the VM was restored to a previous snapshot, reinfected with Mamba, and attached to by the separate debugging VM. Then, by setting the breakpoint at the same call to memcpy as before, the latter two hashes were filled with zero. After allowing execution to continue, decryption was performed with no warning nor error messages.
While the main partition appeared to be decrypted successfully, it was revealed that the other partitions were encrypted using different keys not present in the memory dump. This means the system would never be bootable without the password. Nevertheless, data could still be recovered from the main partition after decryption, which is extremely valuable.
While not realistic, the easiest method to test if the modified decryption was successful is to decrypt the other partitions the proper way. If the VM is able to reboot properly, then the modified decryption would be proven as successful.
So, the VM was rebooted, and no errors were shown!
Summary
While Mamba relies on a simple use of open source encryption software, its impact remains severe. Analysis shows that only under the perfect conditions can decryption take place without knowing the original password, but this will not be applicable to the vast majority of victims.
Despite this, ransomware serves as an interesting avenue to practice a wide range of reverse engineering techniques. Only by using static data flow tracing, synthesizing disassembled code, performing behavioral analysis, and deploying memory forensics is data restoration even theoretically possible.