Background
CrackMe Name: timotei CrackMe#6
CrackMe Author: timotei_
CrackMe Description:
This is pretty much an update of my CrackMe#5. This time the level is raised :-)
Get yourself a keyfile or even better write a keyfilemaker.
Execution
One aspect that drew my eye to this CrackMe is that a file is used as input, not a string. When executing the CrackMe, there is no output and execution exits almost immediately. Since there is no error message indicating that execution failed, this can concluded as a development choice. It is unusual to have a CrackMe produce no output, even when the input is incorrect.

The only discernible benefit from a developer’s stand point is that there are no strings to search for during static analysis. However, considering a success message is most likely printed, the benefit is not weighed heavily.
Static Analysis
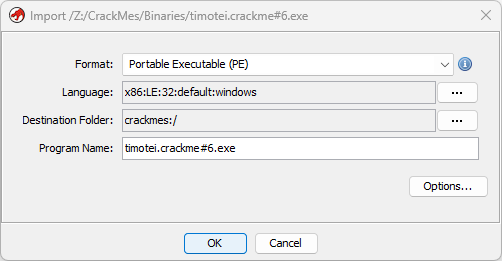
To gather a more thorough understanding of what is executing during runtime, Ghidra can be used to perform static analysis. The CrackMe was loaded into a Ghidra project, where it was recognized as an x86, little endian, 32-bit executable file, compiled on Windows. From here, the binary was opened using the Code Browser and automatically analyzed with the default settings.
Identifying Logic
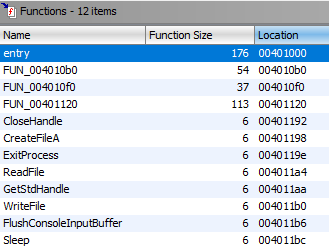
Upon the completion of automatic analysis by Ghidra, it becomes clear that this CrackMe was developed using only assembly. There are only 12 functions, 8 of which are thunk functions of imports from kernel32.dll. This allows for a developer to have very granular control over what the code performs, but is often much easier to understand without the compiler-added garbage and complexities. Since this CrackMe was written using only assembly, the entrypoint is an ideal starting location.
Understanding Key Validation
Within the entry point function appears to be the key validation logic. Since this CrackMe was written using only assembly, Ghidra’s decompiler is not as useful as reading the disassembled code that the developer wrote. There is no obfuscation in the disassembled code, so it just a matter of creating a key file that contains exactly what is described in the disassembled code.
The first problem is how the input file is provided to the CrackMe. There was no prompt for the location of the file, nor an error message stating that a file did not exist. Looking at the disassembled code, it can be seen that a call to CreateFileA is made at the beginning of the function. The first argument passed to this functions is “timotei.CrackMe#6.enjoy!” which is the file name. Other arguments passed to this function causes the file to be opened in read mode and reserves exclusive access to the file. Despite the name of the function, the arguments passed also prevent the file from being created if it does not exist.
Now that we know the name of the file, the content requirements must be discovered. A call to ReadFile shows that no more than 80 characters are read from the file. However, immediately after this call, a conditional checks the number of bytes read. If the number of bytes read was not exactly 13, then the program exits. With this, we can conclude that file “timotei.CrackMe#6.enjoy!” must contain exactly 13 bytes.
Next, three integers (four bytes each) are read from the beginning of the file, called num1, num2, and num3. A guard is in place, such that num1 - num2 + num3 ≥ 12345678. If this is not true, then the program exits.
Lastly, there are two bytes that must be set to a specific value:
- The byte at offset 10 must be 0x36.
- The last byte of the file must must be equal to the least significant byte (little endian) from the previous arithmetic.
00401000:   PUSH       0x0                                 \
00401002:   PUSH       0x80                                 |
00401007:   PUSH       0x3                                  |
00401009:   PUSH       0x0                                  | Open a file named: timotei.CrackMe#6.enjoy!
0040100b:   PUSH       0x0                                  | The file will not be created.
0040100d:   PUSH       0x80000000                           | Has exclusive access.
00401012:   PUSH       lpFileName                           |
00401017:   CALL       KERNEL32.DLL::CreateFileA           /

0040101c:   CMP        EAX,-0x1                            \  If open failed, exit.
0040101f:   JZ         0040109e                            /

00401021:   MOV        [FileHandle],EAX                    >  Save the file handle.

00401026:   PUSH       0x0                                 \
00401028:   PUSH       howManyRead                          | Read 0x50 bytes from the file.
0040102d:   PUSH       0x50                                 | buf = contents
0040102f:   PUSH       buf                                  | howManyRead = bytes read
00401034:   PUSH       dword ptr [FileHandle]               |
0040103a:   CALL       KERNEL32.DLL::ReadFile              /

0040103f:   CMP        EAX,0x0                             \ If reading failed, exit.
00401042:   JZ         0040109e                            /

00401044:   XOR        EDX,EDX                             \  Clear EDX.
00401046:   XOR        ECX,ECX                             /  Clear ECX.

00401048:   SUB        byte ptr [howManyRead],0xd          \  If (howManyRead > 13), exit.
0040104f:   JNZ        0040109e                            /  Ignore 0x50 from before ☺

00401051:   MOV        EAX,buf                             \
00401056:   ADD        EDX,dword ptr [EAX]=>buf             | EDX = EDX + (int)buf[0]
00401058:   SUB        EDX,dword ptr [EAX + 0x4]            | EDX = EDX - (int)buf[4]
0040105b:   ADD        EDX,dword ptr [EAX + 0x8]            | EDX = EDX + (int)buf[8]
0040105e:   CMP        EDX,12345678                         | If (EDX < 12345678), exit.
00401064:   JL         0040109e                            /

00401066:   CMP        DL,byte ptr [EAX + 0xc]             \  If (DL != (byte)buf[12]), exit
00401069:   JNZ        0040109e                            /

0040106b:   CMP        byte ptr [EAX + 0xa],0x36           \  If (buf[10] != 0x36), exit.
0040106f:   JNZ        0040109e                            /

00401071:   PUSH       SuccessMessage                      \  All checks passed
00401076:   CALL       write_stdout                         | Print good message
0040107b:   PUSH       newline1                             |
00401080:   CALL       write_stdout                         |
00401085:   PUSH       InputPrompt                          | Prompt for input.
0040108a:   CALL       write_stdout                         |
0040108f:   CALL       read_stdin                           | Wait for input before.
00401094:   PUSH       newline2                             |
00401099:   CALL       write_stdout                        /

0040109e:   PUSH       dword ptr [FileHandle]              \
004010a4:   CALL       KERNEL32.DLL::CloseHandle            | Close the file and exit.
004010a9:   PUSH       0x0                                  |
004010ab:   CALL       KERNEL32.DLL::ExitProcess           /
Creating the Key File
With all of this logic combined, it can be concluded that there are multiple valid key files. I would usually use satisfiability module theory (SMT) for such a task, but the constraints to satisfy are simple enough to solve by hand. The easiest file contents would have:
- num1 = 0x00BC614E or 12345678 in decimal.
- num2 = 0.
- num3 = 0x4E003600 to satisfy the byte-specific constraints.
Since the file is only 13 bytes, it is trivial to create the bytes using a hex editor such as FlexHEX. The only caveat when creating the file is to remember the little endian architecture. For example, 12345678 would be represented as 4E 61 BC 00.
![]()
Since only a name is used in the call to CreateFileA, it can be assumed that the location of the file is in the same directory as the executing CrackMe. As such, the created key file was saved to the appropriate directory and the CrackMe was ran again. This time, a success message appeared, followed by a prompt for input to exit the CrackMe.
